Dive Into Advanced – Understanding how much RAM (Random Access Memory) your Windows 11 laptop has is crucial for optimizing performance and ensuring smooth multitasking. RAM plays a vital role in your computer’s ability to handle multiple tasks simultaneously. Fortunately, Windows 11 offers several straightforward methods to check your laptop’s RAM. Here are five easy and practical ways to do so:
5 Easy and Practical Ways to Check RAM on a Windows 11 Laptop
1. Using the System Settings
The simplest method to check your laptop’s RAM is through the System Settings:
- Open the Settings App: Click on the Start menu (Windows icon) in the taskbar, then select the “Settings” gear icon.
- Navigate to System: In the Settings window, click on “System” from the left-hand menu.
- Access About: Scroll down and select “About” from the list of options on the left.
- Check RAM Information: Under the “Device specifications” section, you will see “Installed RAM.” This will display the total amount of RAM installed on your laptop.
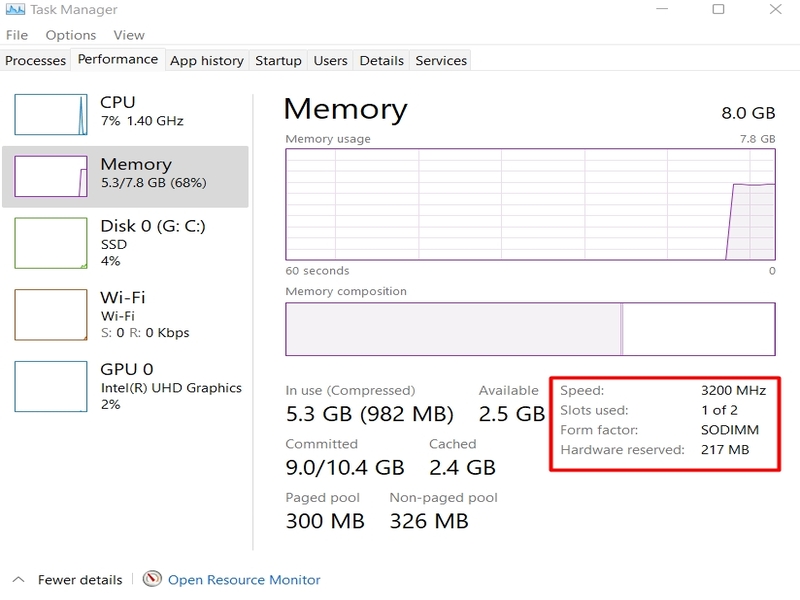
2. Using Task Manager
Task Manager offers a detailed view of your RAM usage and other performance metrics:
- Open Task Manager: Right-click on the taskbar and select “Task Manager,” or press
Ctrl + Shift + Esc to open it directly. - Go to the Performance Tab: Click on the “Performance” tab at the top of the Task Manager window.
- Select Memory: In the left-hand column, select “Memory.” Here, you will find a graphical representation of your usage, along with detailed information such as the total amount of RAM, speed, and the number of slots in use.
3. Using Windows Memory Diagnostic
Windows Memory Diagnostic helps to check the health of your RAM:
- Open Windows Memory Diagnostic: Press the
Windows key, type “Windows Memory Diagnostic,” and select the app from the search results. - Choose Restart Option: You will be given two options—”Restart now and check for problems” or “Check for problems the next time I start my computer.” Choose the option that best suits you.
- View Results: After restarting, Windows will perform a memory test and display the results upon completion. You can view the results in the Notification Center or by reopening Windows Memory Diagnostic.
“OJK Fight Against Online Gambling, Over 6,000 Accounts Blocked”
4. Using Command Prompt
For a more technical approach, you can use Command Prompt to check RAM:
- Open Command Prompt: Press
Windows + S to open the search bar, type “Command Prompt,” and select it from the results. - Enter Command: Type
wmic memorychip get capacity and press Enter. This command will display the capacity of each installed RAM module in bytes. - Convert the Results: If necessary, convert the displayed values from bytes to gigabytes (1 GB = 1,073,741,824 bytes) to get a more readable figure.
5. Using System Information
System Information offers a comprehensive look at your system’s hardware:
- Open System Information: Press
Windows + R to open the Run dialog, type “msinfo32,” and press Enter. - Locate Memory Information: In the System Information window, look under the “System Summary” section. You will find “Installed Physical Memory” which shows the total amount of RAM installed.
These methods offer various ways to check your laptop’s RAM, each with its own level of detail and ease of access. Whether you’re looking for a quick overview or detailed information, Windows 11 provides the tools you need to manage and understand your system’s memory effectively.
“The Complete Information From Wikipedia About Random-Access Memory”
